Eeeek! It's been way over a month again! I managed to finish up my management class with an A- and started to work at Marsh again, so I've been a little busy. And volunteering at the animal shelter of course.
But let's move on to what you really came here for.
If you are friends with me on Facebook, you know I have finally started a summer project, but none that I planned on doing. Since I want to begin cooking and baking as soon as I get into my house, I have decided to begin compiling a recipe collection!!! It is definitely a lot more work than I thought it would be, but it is well worth it. I will be turning 21 and already have my own pile of recipes (last I checked over 60!).
But this isn't your grandma's recipe book or index cards; we are going twenty-first century baby! Word documents, Pinterest invasions, and computer organization is how we are going. Why not just write all the recipes out on cards?
1) Two words: Hand Cramps
2) The amount of frustration of imperfect writing for any perfectionist (me)
3) The amount of time used to write every word, word for word.
Now don't get me wrong; it takes a long time to complete this project, and you may never find an end (because you will be adding more recipes!), but there is a beautiful technology that all students have embraced since it began, and it is the biggest advantage and reason I can think of for doing a computer archive of recipes: COPY AND PASTE! Also, with using Word and saving your recipes, you can easily email your recipes to friends and family as well as print some more from the comfort of your home.
Now you see where I am coming from? Good...
...because you are coming along for the ride!
WHAT YOU WILL NEED
FOR CREATING RECIPE CARDS/PAGES
Computer/laptop with Word or some other word processing software
FOR HARD COPIES RECIPE BOOK
Printer (library printers, especially university library printers, work best)
Storage for Recipes (Binder, pocket expanding file, ect.)
Stickers (Cheap circle ones work fine)
Dividers or some kind of separation
. 1 . Create a System and Design
First and foremost, you need to find out how you are going to save your Word file for your electronic recipe cards. Whether you are an organized person or not, if you want to keep an effective recipe catalog, you need to find a way to put each recipe in a correct place for easy access. I recommend beginning with a new folder and titling it "Recipe." You can always make it a fancy name later.
Also, you will want to make a template for your recipes, a uniform design or presentation of your recipe cards for printing or displaying. This is where your personal touch comes in. There are literally thousands of ways for you to design your template, but unless you have taken a really good technology or Word class, it can be kind of challenging.
Which is why I have ever so nicely provided you mine! I looked everywhere online for a free template and could find none, but I guess I can be nice enough and share you mine ;)
Of course, I took the liberty of taking the border and the swirl design from a Google Image search, but other than that, I simply used text, WordArt, and clipart as a basic and uniform way to create my recipes. Feel free to use this one as your own or as inspiration for your own creation. You can use half pages, no picture, more pictures... It's totally up to you! | 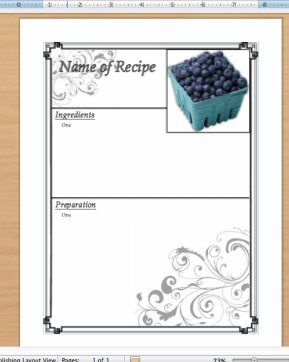 | ||
. 2 . Search Search Search

There are literally hundreds and thousands of recipes online, in cookbooks, and from your friends and family. Now that you have the basic stuff ready to go, it's time to collect your inspiration! I turned to Pinterest and started bombing everyone's feeds with tons of pictures of delicious food. When using Pinterest, make a board specifically for your recipe book so you can find them later when it's time to type them up. I used a simple title "Adding to Recipe Collection," but feel free to make yours catchy and inspiring!
. 3 . Copy the Recipes (while trying not to drool)
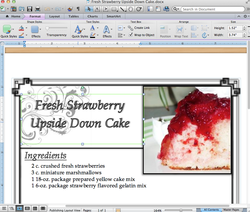
Now that you have some starting recipes to begin, it's time for the time consuming part (yes, this is more time consuming then looking at delicious food). Open up the template you have set up and begin! What I like to do first is save a picture of the food item in a separate folder (I used a folder named Recipe Pictures) and change the picture from your default picture if desired. Resize to the appropriate height and width desired. Change the name of the recipe, and start typing the ingredients. It's very important to make sure you notice and CORRECTLY TYPE the differences between common mistakes. Tablespoon and teaspoon, baking powder and baking soda.
Then type up the directions to prepare. It is also important to keep a sharp eye and type exactly how the recipe states.
But if you are too lazy to type, just copy and paste! Fix any formatting differences that bother you and "SAVE AS" the document as a Word Doc (not as the original template). As easy as all this sounds, it can take a while to get in the groove of making the recipe cards/pages themselves, but once you start, it's not too bad; turn on the TV or some music to keep you entertained.
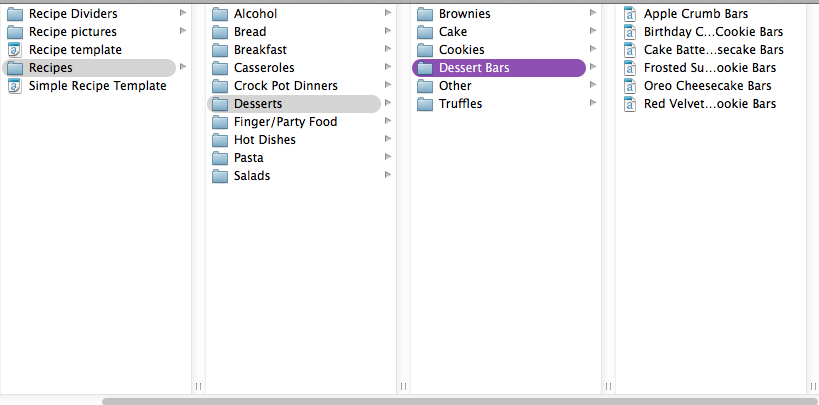
As you go along saving your recipes, begin to create new folders for all the different types: Pasta, Dessert, Casseroles, Brownies, Cakes, whatever and however you choose to organize!
Then type up the directions to prepare. It is also important to keep a sharp eye and type exactly how the recipe states.
But if you are too lazy to type, just copy and paste! Fix any formatting differences that bother you and "SAVE AS" the document as a Word Doc (not as the original template). As easy as all this sounds, it can take a while to get in the groove of making the recipe cards/pages themselves, but once you start, it's not too bad; turn on the TV or some music to keep you entertained.
As you go along saving your recipes, begin to create new folders for all the different types: Pasta, Dessert, Casseroles, Brownies, Cakes, whatever and however you choose to organize!
. 4 . Hold Them in Your Hands: PRINT

You can either stop at the above step or you can go one step further; print out your recipes! It's important to keep in mind that a lot of paper will be used in this process, and you should make sure that the recipe cards will print okay before printing 20 mistakes. I print mine out in black and white to avoid using up costly color ink. Also, go to a library or somewhere that printing is more accessible. As a Ball State student, I get 500 free prints per semester, so it has been very beneficial for this project. Otherwise, you can always print when you want to use the recipe rather than printing them all at once; again, it's up to you.
. 5 . Organize Your Recipe Book
More liberty, more choices for you! Now it's time to put your precious paper recipes somewhere for safe keeping. I chose a 13-pocket expanding file that I found at Walmart to store my findings. A binder with dividers will work as well, but I find that an expanding file makes more sense; it's already divided out and keeps papers from falling out so easily. And you don't have to spend extra money on dividers for a binder.
I also bought some simple stickers from the Walmart office section. I plan to use them to put where I got the recipe from, like Mom or Pinterest, and then put the dates of when I attempted to make that food. That way, it can double as a memory book as well!
I also bought some simple stickers from the Walmart office section. I plan to use them to put where I got the recipe from, like Mom or Pinterest, and then put the dates of when I attempted to make that food. That way, it can double as a memory book as well!
AND THERE YOU HAVE IT FOLKS!
My Recipe Book Tutorial!
My Recipe Book Tutorial!
Now I am not quite finished with my project yet. In fact, I just recently started printing pages and just purchased my file and stickers last night. I still plan on printing about 30 pages of recipes as well as organizing them out in the file. I also want to put a label on the spine of my expanding file as well as the front just for more decoration. But so far, I have had a blast finding and making these recipe pages and can not wait to be able to begin making some of these for real.
And I hope you do the same!
And I hope you do the same!
| And as always Stay Classy -Holly | Be sure to follow me on Pinterest for recipes and more! |

 RSS Feed
